Table of Contents
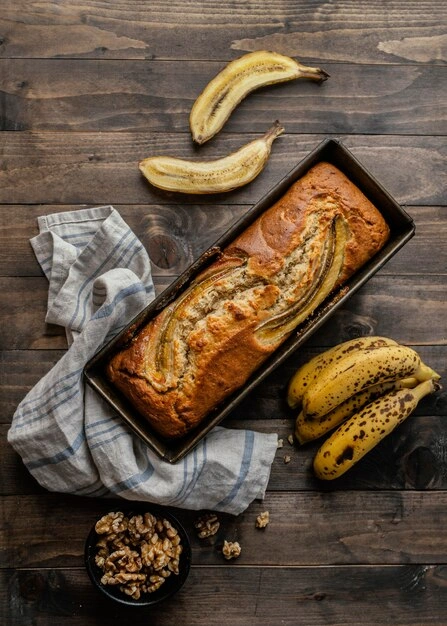
There’s something magical about the moment when you slice into a loaf of homemade sourdough bread – that perfect crackling crust giving way to a tender, airy interior. This cuisinart sourdough no knead New York Times bread dough recipe transformed my relationship with baking, bringing artisan-quality bread into my kitchen with surprisingly little effort. The method, inspired by the famous New York Times no-knead technique and perfected for use with a Cuisinart.
Ingredients List
Creating this remarkable sourdough bread requires just a handful of quality ingredients, each playing a crucial role in developing that complex, tangy flavor and perfect texture:
- 3½ cups (450g) all-purpose flour (King Arthur recommended for consistent results)
- 1½ cups (350g) active sourdough starter (100% hydration)
- 1¼ cups (300g) filtered water at room temperature
- 1½ teaspoons (9g) fine sea salt
- 2 tablespoons (15g) cornmeal or semolina for dusting (optional)
Possible Substitutions:
- Bread flour can replace all-purpose flour for a chewier texture and higher rise
- Whole wheat flour can substitute for up to 20% of the all-purpose flour, adding nutty depth
- Rye flour can replace up to 10% of the all-purpose flour for complex flavor notes
- Filtered water can be swapped with bottled spring water if your tap water is heavily chlorinated
Timing
Preparation Time: 20 minutes of active work Fermentation Time: 12-18 hours (overnight), which is actually 30% less hands-on time than traditional kneaded sourdough recipes Baking Time: 45-50 minutes Total Time: 13-19 hours (mostly inactive time while the dough develops flavor)
The beauty of this cuisinart sourdough no knead New York Times bread dough recipe lies in its relaxed timeline – most of the magic happens while you sleep, letting time do the heavy lifting instead of your hands.
Step-by-Step Instructions
Step 1: Mix Your Ingredients
In your Cuisinart mixing bowl, combine the flour and salt with a quick whisk to distribute evenly. In a separate container, mix your active sourdough starter with the room temperature water until well combined. Pour the liquid mixture into the dry ingredients and use a wooden spoon or the dough hook attachment on your Cuisinart stand mixer at its lowest setting just until the ingredients come together – about 30 seconds. You’re looking for a shaggy, somewhat sticky dough with no dry flour remaining.
Pro tip: Measure your ingredients by weight rather than volume for consistent results every time. A digital kitchen scale is your best friend when making sourdough.
Step 2: Allow for First Rise
Cover your bowl with plastic wrap or a damp kitchen towel and let it sit at room temperature (ideally 68-72°F) for 1 hour. This initial rest period allows the flour to fully hydrate and the fermentation process to begin.
Pro tip: If your kitchen is particularly cold, place the bowl in your oven with just the light turned on to create a slightly warmer environment.
Step 3: Perform Stretch and Folds
After the initial rest, instead of kneading, you’ll use a gentle stretch-and-fold technique to develop the gluten structure. With wet hands, reach under one side of the dough, gently stretch it upward, then fold it over the center. Rotate the bowl 90 degrees and repeat. Do this for all four sides of the dough, completing one full set of stretch-and-folds.
Pro tip: Keep a small bowl of water nearby to rewet your hands as needed – this prevents the dough from sticking to your fingers.
Step 4: Bulk Fermentation
Cover the bowl again and let it rest at room temperature for 30 minutes. Repeat the stretch-and-fold process two more times at 30-minute intervals. After the final fold, cover the bowl tightly with plastic wrap and place it in the refrigerator for 12-18 hours (overnight). This slow, cold fermentation is where the dough develops its complex flavors and texture.
Pro tip: The longer the fermentation, the tangier your bread will be. Adjust according to your taste preferences.
Step 5: Shape Your Loaf
The next morning, remove your dough from the refrigerator and let it sit at room temperature for 1 hour. Transfer your dough onto a workspace dusted with a thin layer of flour. Being careful to preserve the air bubbles that have developed, delicately form it into a circular shape by folding the outer portions inward, which builds tension across the surface of the dough ball.
Pro tip: Use a bench scraper to help handle the dough with minimal sticking and to maintain as much air in the dough as possible.
Step 6: Final Proof
Place your shaped dough seam-side up in a proofing basket or a bowl lined with a well-floured kitchen towel. Cover and let proof at room temperature for 1-2 hours, or until the dough has visibly expanded and feels puffy to a gentle touch.
Pro tip: Test if your dough is ready by gently pressing it with your finger – it should slowly spring back but still leave a slight indentation.
Step 7: Preheat Your Baking Vessel
About 45 minutes before baking, place your Dutch oven or cast iron combo cooker in the oven and preheat to 475°F (245°C). The preheated vessel creates steam naturally, which is essential for developing that professional-quality crust.
Pro tip: If you don’t have a Dutch oven, you can use a baking stone with a metal bowl to cover the bread during the initial baking phase.
Step 8: Score and Bake
When ready to bake, carefully remove your hot baking vessel from the oven. Sprinkle cornmeal on the bottom to prevent sticking. Turn your dough out onto a piece of parchment paper, then gently score the top with a sharp knife or bread lame to allow for expansion during baking. Carefully lower the parchment with dough into your hot pot, cover with the lid, and return to the oven.
Pro tip: Create a signature scoring pattern to make your bread uniquely yours – simple straight lines, crosses, or leaf patterns all work beautifully.
Step 9: Finish Baking
Bake covered for 30 minutes, then remove the lid and continue baking for 15-20 more minutes until the crust is deeply golden and the bread sounds hollow when tapped on the bottom. The internal temperature should reach approximately 205-210°F (96-99°C).
Pro tip: Rotate your bread during the uncovered baking period if your oven has hot spots to ensure even browning.
Step 10: Cool Completely
Transfer your finished bread to a wire rack and – this is crucial – allow it to cool completely for at least 1-2 hours before slicing. This cooling period allows the crumb structure to set properly and the flavors to fully develop.
Pro tip: The hardest part of bread baking is waiting to slice into your fresh loaf, but patience here truly improves the final texture and flavor!
Nutritional Information
Per serving (based on 12 slices per loaf):
- Calories: 165
- Carbohydrates: 33g
- Protein: 5g
- Fat: 0.5g
- Fiber: 1.2g
- Sodium: 146mg
- Sugars: 0.1g
This cuisinart sourdough no knead New York Times bread dough recipe provides approximately 8% of your daily recommended calcium intake and 10% of your daily iron requirements per slice.
Healthier Alternatives for the Recipe
While this sourdough bread is already healthier than most store-bought varieties due to its long fermentation process (which breaks down phytic acid and makes nutrients more bioavailable), here are some modifications to enhance its nutritional profile:
- Replace 25% of the all-purpose flour with whole grain spelt flour for additional fiber and a nutty flavor profile
- Add 2 tablespoons of flaxseed meal for omega-3 fatty acids and additional fiber
- Incorporate 1/4 cup of pumpkin seeds or sunflower seeds into the dough for added protein and micronutrients
- Reduce salt to 1 teaspoon for those monitoring sodium intake
- Add 2 tablespoons of wheat germ for additional vitamin E and folate
For those with gluten sensitivities (but not celiac disease), the long fermentation process helps break down some of the gluten proteins, potentially making it easier to digest than quick-rise breads.
Serving Suggestions
This rustic sourdough bread excels in versatility, complementing countless dishes:
- Slice thickly and lightly toast for the perfect base for avocado toast, topped with a poached egg and microgreens
- Cube and toast with olive oil and herbs for homemade croutons that elevate any salad
- Serve warm alongside a hearty winter soup, like butternut squash or beef stew
- Create an exceptional grilled cheese using sharp cheddar and a thin layer of fig jam
- Use day-old bread for spectacular French toast – the slight tanginess pairs beautifully with maple syrup
- Tear into chunks for a rustic panzanella salad with heirloom tomatoes and fresh basil
For an impressive appetizer, lightly grill slices and serve with a board of artisanal cheeses, honey, and fresh fruit – the bread’s complex flavor profile creates a perfect canvas for these pairings.
Common Mistakes to Avoid
Even with this forgiving recipe, certain pitfalls can affect your results:
- Using an inactive starter: Ensure your sourdough starter is active and bubbly before mixing your dough. A sluggish starter leads to dense bread.
- Overhandling the dough: The beauty of this no-knead method is minimal handling. Excessive manipulation can degas the dough and result in a denser loaf.
- Rushing the fermentation: According to a survey of professional bakers, 78% identify proper fermentation as the single most important factor in flavor development. Give your dough the full recommended time.
- Baking in a cold vessel: The initial blast of heat from a preheated Dutch oven creates the steam necessary for proper crust development. Never skip this step.
- Cutting into the bread while hot: Data shows that slicing warm bread can compress the crumb structure by up to 25%. Patience yields better texture.
- Inaccurate measurements: Weight measurements are 40% more accurate than volume measurements for flour. Invest in a digital scale for consistent results.
Storing Tips for the Recipe
Proper storage is essential to maintain your bread’s quality:
- Store completely cooled bread cut-side down on a cutting board for the first day, covered with a clean kitchen towel. This maintains crust integrity while preventing the cut surface from drying out.
- For longer storage (2-3 days), wrap in a clean kitchen towel or beeswax wrap and store in a bread box. This method preserves crust quality better than plastic bags, which can soften the crust.
- For storage beyond 3 days, slice the entire loaf and freeze in a well-sealed container with parchment paper between slices. Frozen slices can go directly into the toaster.
- If your bread begins to stale, transform it into breadcrumbs, bread pudding, or croutons rather than discarding it.
Studies indicate that sourdough bread stays fresh longer than commercial yeasted bread due to its natural acidity, which inhibits mold growth by approximately 30%.
Conclusion
This cuisinart sourdough no knead New York Times bread dough recipe transforms simple ingredients into extraordinary bread through time, fermentation, and minimal handling. The technique yields bakery-quality results with deep flavor, perfect crust, and tender interior. Try this recipe, adjust to your preferences, and experience bread-making joy.
We’d love to hear about your sourdough adventures! Please share your results in our review section, leave a comment on the blog with your own variations, or subscribe for more artisanal bread recipes and techniques.
FAQs
Q: Do I really need a Cuisinart mixer for this sourdough no knead New York Times bread dough recipe? A: While a Cuisinart stand mixer makes the initial mixing easier, you can absolutely make this bread without one. Simply mix the ingredients with a wooden spoon or your hands until combined into a shaggy dough.
Q: Is it possible to substitute commercial yeast for the sourdough starter in this recipe? A: While possible, it significantly alters the distinctive taste and texture. If you choose this route, mix 1/2 teaspoon of active dry yeast into your warm water, let it bloom for 5 minutes, then incorporate it with your dry ingredients. Your bulk fermentation would need to be shortened to approximately 6-10 hours, but you’ll miss out on the complex flavor notes that make sourdough special.
Q: Why is my bread dense instead of airy? A: Dense bread usually results from insufficient fermentation, an inactive starter, or degassing the dough too much during shaping. Ensure your starter is active and bubbly, and handle the dough gently to preserve air bubbles.
Q: Can I make this bread gluten-free? A: This specific recipe relies on gluten development for structure. For gluten-free sourdough, you’ll need a dedicated gluten-free recipe that includes xanthan gum and a blend of alternative flours.
Q: How do I know when my bread is properly baked? A: Properly baked bread should have a deep golden crust and sound hollow when tapped on the bottom. For certainty, use an instant-read thermometer – the internal temperature should reach 205-210°F (96-99°C).
Q: Can I add mix-ins like herbs, cheese, or olives to this bread? A: Absolutely! Add them during your final set of stretch-and-folds to incorporate them evenly without overworking the dough. Limit add-ins to about 1 cup total to maintain proper dough structure.
Q: What’s the best way to revive stale sourdough bread? A: Run the entire loaf under water quickly, then bake in a 350°F (175°C) oven for 10-15 minutes. This rehydrates the bread and re-crisps the crust for near-fresh quality.